Labels:
Showing posts with label Crafts. Show all posts

Wednesday, June 30, 2010

I have always wanted to try my hand at making fondant frosting. I stumbled across a pretty great online tutorial, so I thought that I'd finally give it a shot as my sister's birthday was fast approaching.

Kelsey loves red velvet cake, but I'm not a huge fan of the massive amounts of food coloring needed. I would've loved to use beets for the coloring, but being the picky eater she is, I know that she wouldn't have gone for it. Has anyone tried this? I wonder how cakes colored with beets taste? I tried a recipe from my new bargain book ($1 from Half Price Books!), Little Cakes: Classic Recipes for Any Occasion. It was so delicious and can't wait to try all of the recipes!


My cakes came out beautiful and delicious. By the way, I learned a rather neat trick to get a cake to come out of the pan without sticking to the bottom: After removing from the oven, set the pan on a damp towel while the cake cools. Once it's time to remove the cake from the pan --- Voila!! No huge chunks stuck to the bottom!


I made my fondant in advance (it keeps in the fridge for a few weeks), which really helped out on time because the fondant took for-ev-er to roll out! You definitely need some muscles for that project!


I'm super proud of how smooth I got it to lay on the cake, but not so happy about the color. It's a little too reminiscent of the Nickelodeon green slime.


I had fondant left over and time to spare, so I decided to throw a little embellishment on the cake. It definitely made it look even more ugly than before! :) Is it just me, or does it seem like Kelsey is laughing at how horrendous it looks?

All in all, it was a fun project with yummy results. Since I made the fondant out of marshmallow, it came out more sweet than yucky like store-bought fondant. I think if I fine-tune my decorating skills, that it could actually make for a pretty nice looking cake since I like the smoothness of fondant.

If you want to see something even more ugly, stay tuned for my failed attempt at a cake mix cookie. I promise that you won't want to make these yourself!


Monday, June 7, 2010

I can finally cross another craft project off of my summer to-do list! I've been wanting to make some cute onesies for Azra for some time now. When I ran across this freezer paper stencil tutorial, I knew that I had to try it. Sure enough, it was a super simple project with super cute results!

To begin, I drew my design on the paper side of a piece of freezer paper. Make sure to recognize which pieces you actually want to cut out to paint the inside, or you'll be drawing/cutting twice as I did. Place the stencils wax side down on your fabric. To give the fabric some added stiffness, I placed a sheet of paper on the underside of the fabric as well. With your iron set on medium, iron over the freezer paper for a few minutes. It should begin sticking immediately.


Once it has set, you can begin painting. I used some acrylic paint that I had lying around, but I'm sure that fabric paint would work best. I took care to paint from the outside in, so as to not let the paint bleed under the paper.


I let the paint set for just a few minutes, then I carefully peeled off the paper to view my results!


A perfect little panda for the babe. I love the outcome and can't wait to start making tons of other designs!

Monday, June 15, 2009

Apparently 2009 is the year for babies - I have two cousins on each side of the family expecting! There will be a trio of infants at this year's Thanksgiving at my mom's side, and there will be FIVE infants on my dad's side (my cousin Katie is having triplets!). Baby #1 arrived this month to my cousins Brian & Cathy. I haven't yet been out to see him, but my mom sent pictures and he sure is a beautiful baby.

Baby Cruz
Born: 6/8/09

Cathy was able to make it up for my brother's graduation, so I gave her Cruz' birthday gift a little early knowing I probably wouldn't be able to make it back to Nebraska after he was born. I've been living on my sewing machine whenever I'm not at work or reading, so I decided to make him a few things.

The first was a hooded towel. I bought 1.5 yards of yellow terry cloth and just used scrap fabrics for the accents. It was pretty easy to make, but I must admit that sewing in circles took a lot of patience for me. It is big enough that he can be wrapped up snugly now, but still be able to use it once he reaches the toddler stage.

The second was just a simple tag blanket. I got some super soft minky fabric and a fun, gender-neutral fabric for the front. It was my first go at sewing on stretch fabric, and I hated every minute of it. Actually, it was my second attempt - the first was a miserable failure that is super cute, but poorly constructed. Chris liked it though, so I kept it for Baby Curtis. I love the idea of tag blankets as I grew up carrying around a gross burp cloth as my security blanket, so I plan on making many more of these for other gifts as they're just so darned cute! Too bad the minky fabric wasn't so expensive, but it's worth it!


I have a lot of other projects complete that are just waiting for their time to shine online, so hopefully I can get the pictures up soon!

Have you ever walked into a modern art museum and thought to yourself, "Hey, I could make that!"? I know I have. Modern art museums are one of my favorite things to visit while vacationing. And not necessarily to appreciate the art, but to make fun of it. Granted, there are some really cool and inspiring pieces that grace the walls of the museum, but there are usually a lot more absurd pieces available.


Most absurd pieces I've seen to date:

1. Wood stair rail, Neues Museum in Nuremberg, Germany

Unpainted, black iron hinges still attached, laying on the floor at an angle. Perhaps it was the manner in which it was laid is what made it art (if it were instead parallel to the wall, then would it just be a 2"x4" instead of a masterpiece?).


2. Wall of framed pieces of hair from 100 different people, Kunstmuseum in Stuttgart, Germany

One squiggly piece of hair per frame. Beautiful, just stunning. I was moved.


3. Three-screen video of a woman repeatedly falling back on a wall, Walker Art Center in Minneapolis, MN

I will never understand the "art" of artsy films. It was quite possibly the dumbest thing I've ever seen, but I imagine many an artist walked by and stared for hours to find the meaning of the film.


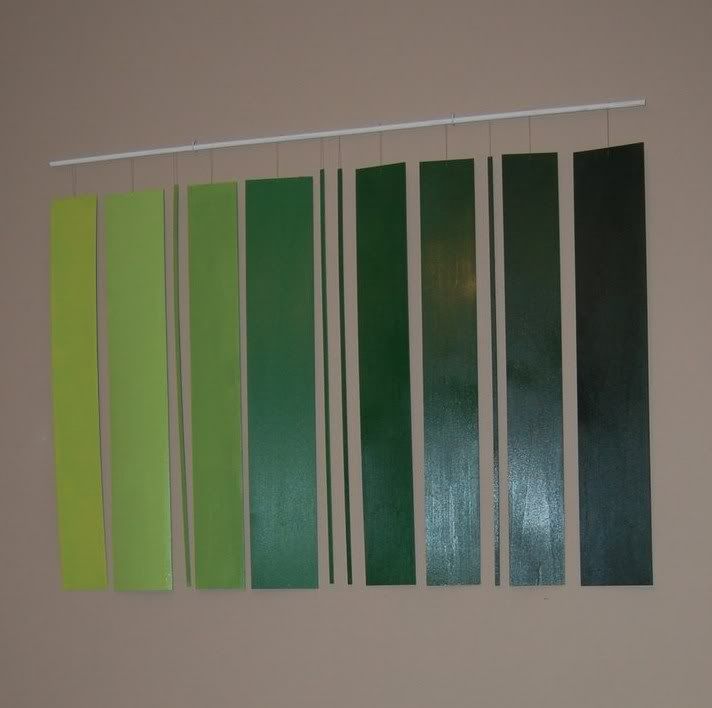
Anyway, all of this to set the scene for my recent nursery project! I found this super cute wall mobile on Fawn and Forest website:


Like everything else on their website, it is fun, unique and colorful. And also like the rest of their products, it's darned expensive -- $330!! Shoot, I was just about ready to hit "buy" before I saw that! As with the modern art in the museums, I thought to myself: I could make that! And so I did.


SUPPLIES
Wood panels
Wood dowel
Fishing wire
Acrylic paint
Lacquer spray paint

During my initial brainstorming process, I thought of cutting Styrofoam to size to replicate the aluminum panels in the original mobile, cover with scrapbook paper and Modge Podge, and hang. However, I was lucky enough to stumble across some thin, precut wood panels while scouring the aisles of Michaels. I picked those up, along with a wood dowel, and acrylic paint in green and yellow (I had some white and black left over from another project, which I used to create all of the different shades for the gradient effect). At Walmart, I found the lacquer spray paint needed to give the glossy look of the original, as well as some fishing wire and a few hooks in which to hang on the wall. The hooks allow just enough space between the wall and mobile for the wood panels to sway ever so slightly in order to keep Curtis busy while changing his diaper.

Grand total for the entire project: $330 -- 1/10th the price of the original!!

It may not look as professional as the expensive version, but I am still proud to say that I made it. Plus, finding thrifty ways to get the look of something expensive is way more fun! So, what do you think??